

About
For my game's field guide and camera mechanic, I figured out a way to implement this in Godot. I haven't seen examples yet of this, so I was pleased that the implementation ended up being rather straightforward.
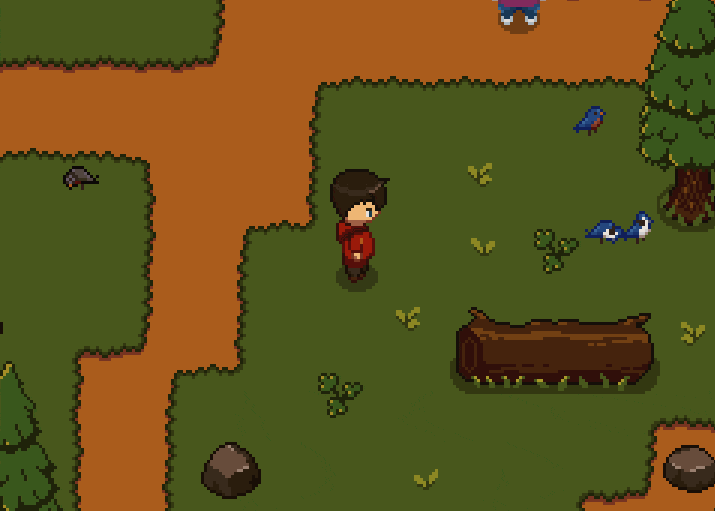
For my camera mechanic, the player can basically take a screenshot of an area of the game's viewport, indicated by a crosshair region that renders when the player is in "camera" mode. Game objects that can be "tagged" are highlighted with a white outline when they are in the crosshair region.
Implementation
Implementing this required some basic vector math and knowledge of Godot's APIs, but the basic idea is to take a screenshot of the viewport, crop it to the area in the crosshair region, then make it a texture. Below is a step-by-step explanation of the basic code to get this working:
First, wait for the frame to finish rendering before we capture any screenshot.
# Wait until the frame has finished before getting the texture.
yield(VisualServer, "frame_post_draw")
Next, I capture the viewport image and create a texture from the image, which creates a screenshot. We also have to flip it so that it matches what the player actually sees.
# Retrieve the captured image.
var viewport: Viewport = target.get_viewport()
var viewport_image: Image = viewport.get_texture().get_data()

# Flip it on the y-axis (because it's flipped).
viewport_image.flip_y()
Since I only want to capture the area inside the camera crosshair region, now I have to calculate the the crosshair region position within the viewport image.
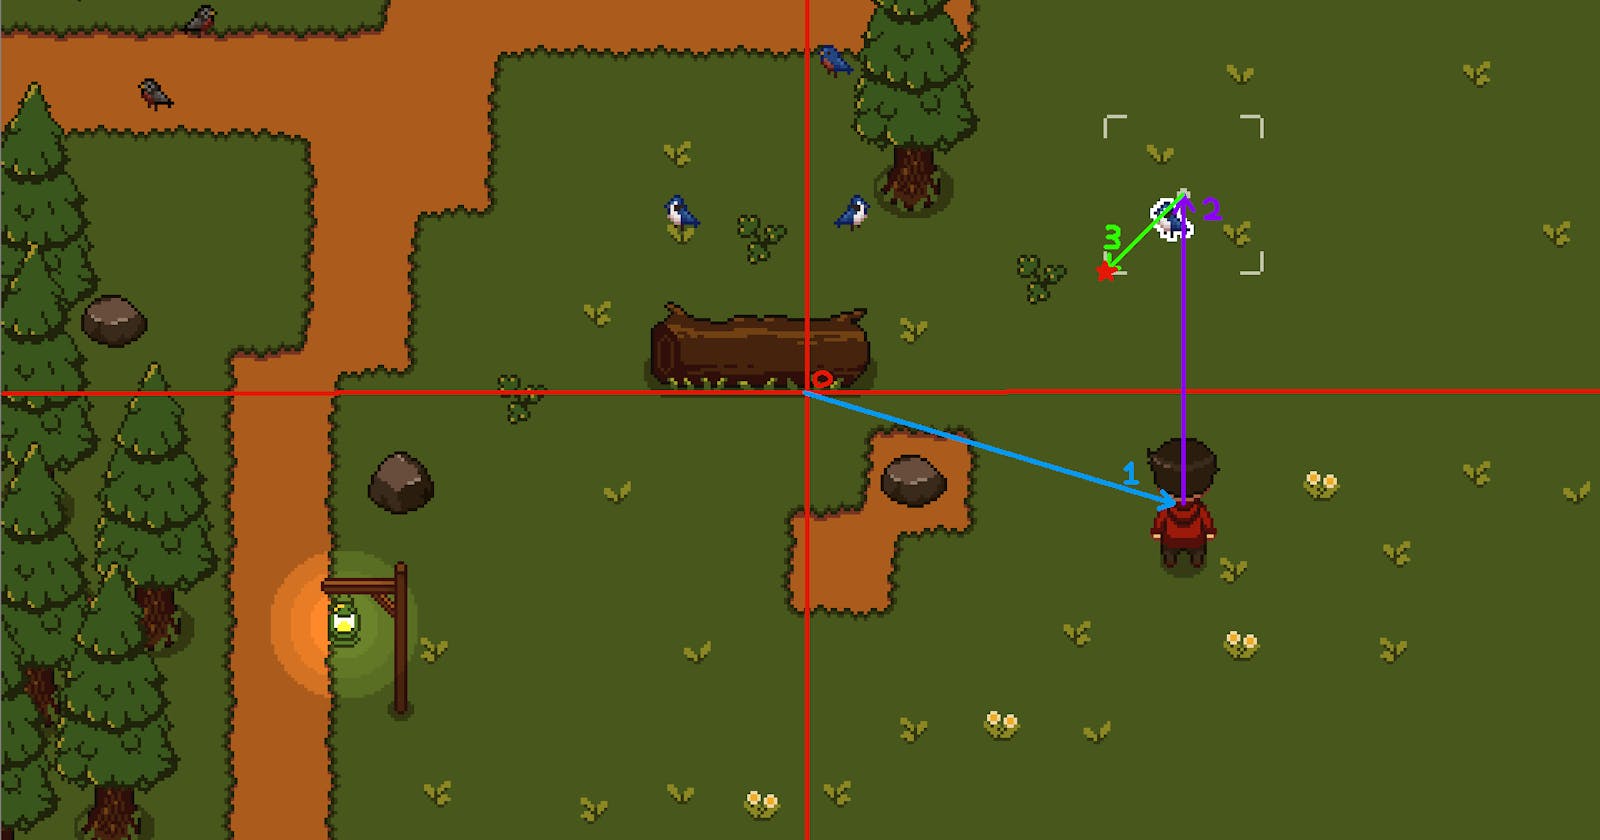
This is a series of Vector2 additions as listed and depicted below:
- Viewport center (Camera2D screen center) -> Camera2D global position
- Camera2D global position -> Crosshair global position (center)
- Crosshair global position (center) -> Crosshair bottom left corner
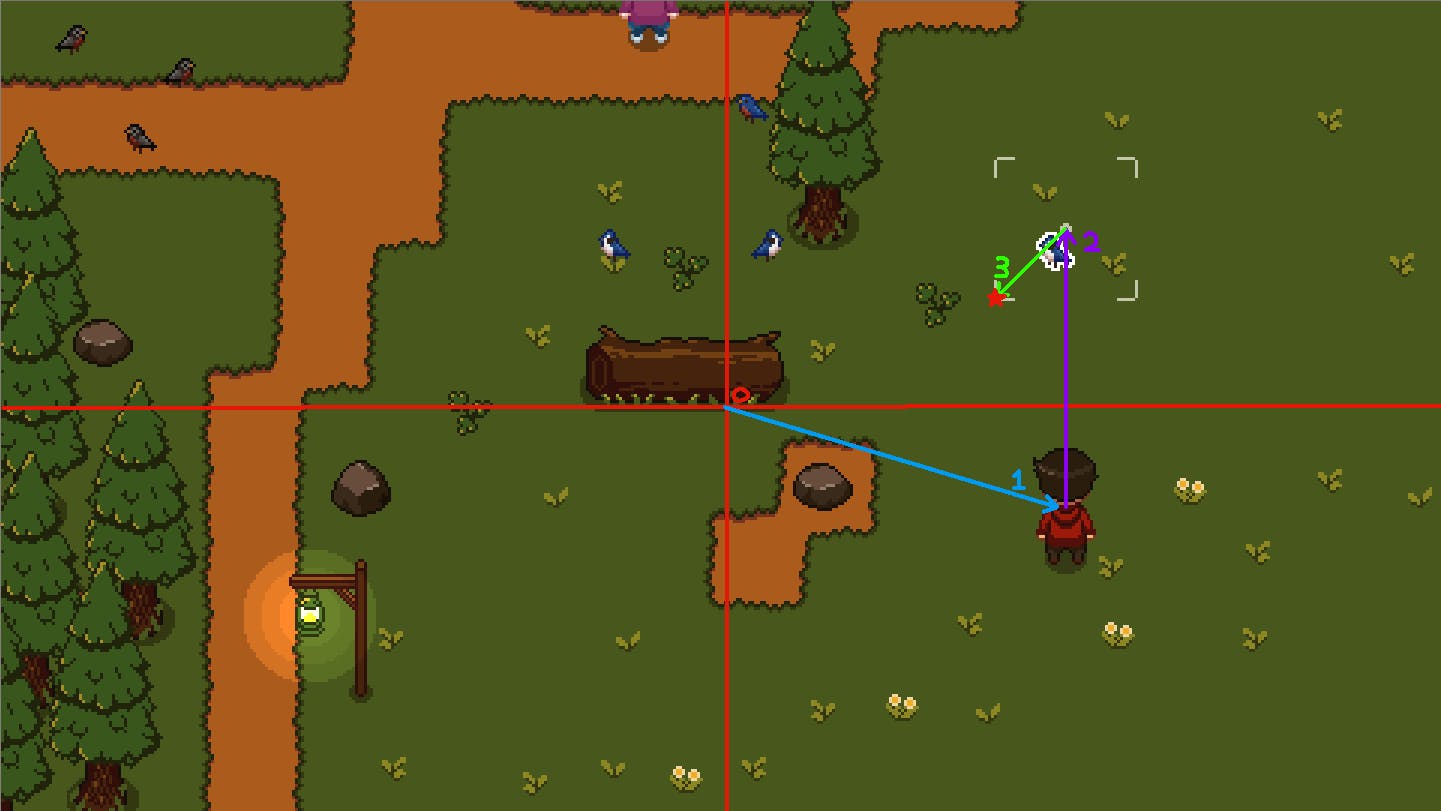
# Width of the crosshair region, which is a square
var crosshair_width = 48
var crosshair_position: Vector2 = crosshair_sprite.global_position

# Vector #3 in the example diagram
# Offset of bottom left corner of the crosshair area relative to crosshair position, which is the center of the crosshair
var crosshair_origin_offset: Vector2 = Vector2.ONE * -0.5 * crosshair_width

# Vector #2 in the example diagram
# Offset of the crosshair position relative to the Camera2D position
var crosshair_offset: Vector2 = crosshair_position - camera.global_position

# Vector #1 in the example diagram
# Offset of Camera2D from screen center, in case player is at map edge so that Camera2d not centered
var camera_offset = camera.global_position - camera.get_camera_screen_center()

# Red star in the example diagram, marking the bottom left corner of the crosshair region
var image_position = viewport.size * 0.5 + crosshair_origin_offset + crosshair_offset + camera_offset
Now I have the position of the image to capture within the crosshair region. Since I want to use image dimensions of 48 x 48 pixels, I create a Rect2 node with the calculated image position and my dimensions, which gives us the rectangle area in the viewport image that we want to crop.
var cropped_image_rect = Rect2(image_position, Vector2.ONE * crosshair_width)
To crop the image, I call get_rect on the viewport image with this Rect2 node. Once I have the cropped image, I can easily create a new ImageTexture and set the image with create_from_image.
# Create a texture for cropped image.
var cropped_image_texture: ImageTexture = ImageTexture.new()
cropped_image_texture.create_from_image(cropped_image)
This texture can now be used in any Sprite or Control node. An example is shown in the full code example.
Full Code Example
func take_photo():
    # Wait until the frame has finished before getting the texture.
    self.crosshair_sprite.visible = false
    yield(VisualServer, "frame_post_draw")

    # Retrieve the captured image.
    var viewport: Viewport = target.get_viewport()
    var viewport_image: Image = viewport.get_texture().get_data()

    # Flip it on the y-axis (because it's flipped).
    viewport_image.flip_y()

    # Width of the crosshair region, which is a square
    var crosshair_width = 48
    var crosshair_position: Vector2 = crosshair_sprite.global_position

    # Vector #3 in the example diagram
    # Offset of bottom left corner of the crosshair area relative to crosshair position, which is the center of the crosshair
    var crosshair_origin_offset: Vector2 = Vector2.ONE * -0.5 * crosshair_width

    # Vector #2 in the example diagram
    # Offset of the crosshair position relative to the Camera2D position
    var crosshair_offset: Vector2 = crosshair_position - camera.global_position

    # Vector #1 in the example diagram
    # Offset of Camera2D from screen center, in case player is at map edge so that Camera2d not centered
    var camera_offset = camera.global_position - camera.get_camera_screen_center()

    # Red star in the example diagram, marking the bottom left corner of the crosshair region
    var image_position = viewport.size * 0.5 + crosshair_origin_offset + crosshair_offset + camera_offset
    var cropped_image_rect = Rect2(image_position, Vector2.ONE * crosshair_width)
    var cropped_image: Image = viewport_image.get_rect(cropped_image_rect)

    # Create a texture for cropped image.
    var cropped_image_texture: ImageTexture = ImageTexture.new()
    cropped_image_texture.create_from_image(cropped_image)

    # Use the texture for whatever you want
    # Here is a basic example that adds a Sprite with the new texture
    var sprite: Sprite = Sprite.new()
    sprite.set_texture(cropped_image_texture)
    self.add_child(sprite)
    sprite.position += Vector2(0, -96)
    self.crosshair_sprite.visible = true
Potential Caveats
There are a couple caveats with this approach that may or may not be actual issues.
- I am assuming that the viewport center is always the same as the camera center. This makes sense to me, but I do not know if this is always the case. I am only using a single Camera2D on my player scene for now, but I wonder if this could be an issue if I later have to manage multiple cameras.
- Capturing the viewport image captures everything in the viewport, including the crosshairs sprite and any HUD overlay that happens to be in the crosshair region. I simply made the crosshairs invisible during the frame that the photo was being taken. As for the HUD, I plan to position the HUD and crosshairs region so that they never overlap. I also removed any shader outlines from any nodes that were only meant as a visual cue that the nodes could be tagged in photos.